Showing posts with label sewing. Show all posts

Thursday, March 24, 2011

DIY: Camo Shorts made into Camo SKIRT

I had found this pair of boys camo shorts at the thrift store sometimes last summer... it took until now for the strong detergent smells to actually be rain blasted out of them (on my clothes line!) ....
I was hoping to make camo short-shorts out of them, but i am actually not that skilled in sewing and they just didn't fit quite right to transform them easily (too much space in the crotch for boy junk!)
So here is a quick sewing trick you can use with boys shorts, your own shorts, old pants, thrifts jeans, etc....
It really is simple as 1,2,3 !!!
.....................................................
STEP 1 ::
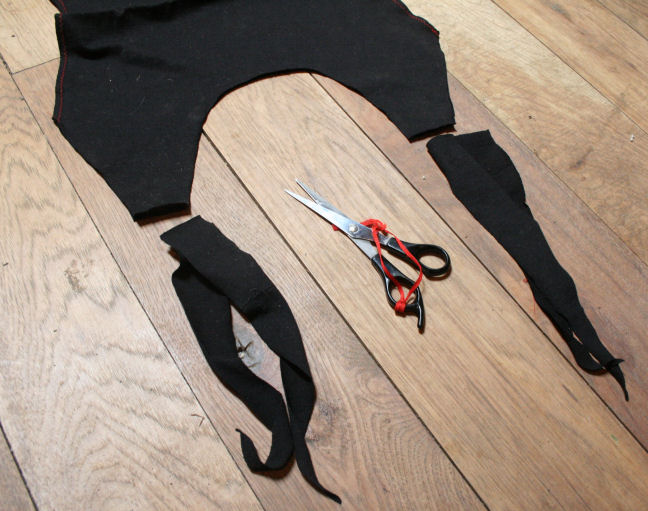
Cut off the legs of the shorts or pants to the length you want your skirt. (see pic above) You can make a knee length or tiny mini!
STEP 2 ::
Cut along the crotch seam. Then along the seams in the front a back...
STEP 3 ::
Fold the cut pieces over on top one another to create skirt shape (like inthe pic below, left folded over right). Sew along the new lines they makes, and cut off any excess from the bottom.
FINISHED!!!!!!!!!
Some majorly militia redneck shit going on here!..... i can't decide whether i would like to make my skirt shorter or not? Or maybe take in the sides?
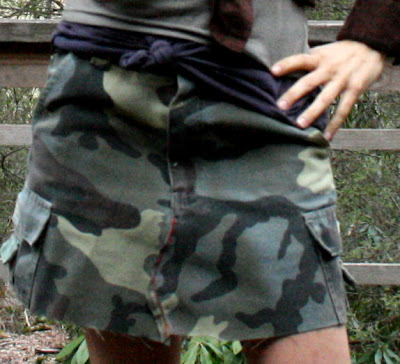
Either way... hardcore!

XOxoxoxox

Sunday, November 14, 2010

Eco DIY: Organic Cotton "Alf" Dress

Yeah, ya read it right... ALF! ha ha ha.
This sewing project is more of a minor upcycle deal, see ya' don't need "Alf" to make this dress...(even though you might think you do!) All you need is an old t-shirt that is nasty, doesn't fit, etc from your closet, grandmaws closet or the thrift store... a t-shirt with a whimsical logo that can be cut out and re-sewn onto a new outfit. I put mine on an organic cotton dress I made from some locally woven fabric. But you could do this with a hoody and put the old logo/character on the back.
THE BEGINNING:::
I pinned down my dress pattern on the fabric, which was the pattern I traced from another dress I already had.
And then chop chop! Cut out the fabric, leaving enough room for the side seams.
I had folded the fabric over, so that the front and back would be cut at the same time. I like efficiency... :)))
I left the pattern pinned on while I sewed in the seams along the edge... then unpinned the pattern.
I love making things adjustable! So I made the top of the 'sleeves' or straps the kind you can tie to any size....
Once the organic dress was sewn together, it was time for ALF!!!
CAREFULLY pin your logo on, you want it really flat and even so that it doesn't wrinkle or bunch up the front of the shirt or dress or hoody or whatevs you may be sewing it on...
Then SEW! I used the basic straight stitch and slowly went around the circle of Alfness...
ALF HYSTERIA:::::
hysterical? lovable? weird? so was Alf.
You can wear it with or without a shirt underneath... summer time, or fall time...
party time?!? WWAD ? ;)

XOXOXOxox

Thursday, November 11, 2010

Eco DIY: Bamboo Ruffle Butt Party Dress

Ruffle BUTT! You can never accentuate your ASSet too much, that's why music makes you want to shake it. I saw a dress like this on Etsy but not only was it too expensive for my personal pocketbook but it didn't come in a sustainable fabric in the color purple. (Purple is my favorite color!) I got some stretchy purple bamboo fabric online, and got to sewing this booty jiggle gem.
STEP 1::
I used a tight stretchy sleeveless dress to trace a pattern... it's important that if you trace another piece of clothing for a pattern, that the fabric you are about to sew with has the same properties of stretch or no stretch. I used the heavy book trick (thanks to reader Liberty for the idea!) to hold the paper real flat.
STEP 2::
Lay your pattern on the fabric. I used pins to make sure it was tight. The fabric was doubled, with the fold at the top shoulder... that way I could cut the front and back out at the same time and the shoulders would already be connected without having to sew them.
STEP 3::
SEW. I sewed seams up the left and right side, leaving holes for the arms, where the sleeves were to go. I also hemmed the edges in the back, front and bottom. I was too lazy to take the pins off the pattern paper, and then put them back on again, so i sewed right outside the paper line for the seam, then removed the pattern.
Step 4::::
SLEEVES::::
Why are sleeves so mysterious?? I don't think I ever do them the same twice, every time I am just shooting chance to the sky hoping a sleeve will work.
This time i took the arm hole existing and drew a sleeve that would accurately connect to it. It was a free hand experiment, with no measurements.
I cut out the arm pattern, then doubled the fabric twice to cut all the arm pieces out at once.
Then I sewed the sleeves on, just right on top the hole.
*
I took the scrap fabric pieces from cutting out the body pattern for the ruffle on the butt. I centered the first one and then just crinkled them up and sewed a seam across the top of each crunched, scrunched layer...
THE END::::::::::
Tight and comfy and ruffley- I am going to wear this all day. :)
YAY! Makes me want to DANCE...!
Xoxoxox

Friday, November 5, 2010

Eco DIY: Fabulous Scrap Fabric Purse

Craft bonanza! After making my patchwork blankie out of scrap fabric I sat down with a notebook & pen and started dreaming up other simple DIY projects. This handbag is not hard to make and looks very eco chic (superior handmade style!)
It's also made entirely out of fabric, so all you need are basic sewing skills to put it together.
*
STEP 1 :
Choose two contrasting fabrics, and pin them together in a rectangle shape to cut out.
I chose some velvety animal print, and a kimono type fabric for their flamboyant contrast.
STEP 2 :
Fold over the top edges of the purse, and sew a strong seam at the very bottom. This is to create a drawstring style hole for the purse straps to pull through.
Both sides should then have the drawstring hole, which are sewn into the inner side of the purse. (see pic below)
STEP 3 :
Fold the purse over, with the drawstring holes lining up evenly. Sew a seam along both sides (left and right) but NOT over the drawstring holes.
The purse should then look like this pic below... my animal print is the inner part, and the kimono fabric is the outside of the purse.
STEP 4 :
THE STRAPS ::::
Cut six strips of scrap fabric (or tie pieces together), make two groups of 3 strips, tie a knot at the top of each one, then BRAID! yay! I love braiding. :)

Use a big safety pin to pull your braided strap through the drawstring holes on both sides...
...tighten the straps, then tie them together at the top.
ALL DONE!
HANDBAG HEAVEN :::::
How easy and cute is that?! Plus functional! You could use this as a purse, but also as a knitting/crochet bag! Or maybe carry your small pets around the house in it. ;)
I like this eco crafting project alot... now back to my notebook to think up more things I can do with this fabric.
****

Here is a quick lil' tutorial vid for this DIY Purse project -(if you learn better with music and short commands...) ;)


Xoxoxo

Thursday, November 4, 2010

Eco DIY: Patchwork Blankie (from scrap fabric)

My ever ambitious mom entered me into a craft fair (ohmygawd Mom!), and I have only one month to make a craft booth's worth of eco friendly stuff! I am bracing myself for a month of non stop crafty mania...
and here is the very first project.
I have had this one tucked in the corners of my imagination for a while now, a patchwork blankie of luscious luxurious colors. A blankie made of only scrap fabric, sewn together in a simple way. I got the scrap fabric that was left over from a seamstress friend (it's amazing all the fabric that is left & discarded from people's pillow, curtain, and bed spread decor!)
STEP 1:
I cut a buncha squares the same size (see top pic with my cat Toots in it). I cut enough so there could be four rows of six squares.
*
STEP 2:
I sewed squares together - 6 in a row going up and down. (see pic above) I did this four times, making four separate LONG rows.

(NOTE: however you decide to sew them together, the important part is just being consistent. I laid the right side over the edge of the left side of each square and sewed a seam on top. Every time.)
STEP 3:
I took each row, turned them to the under side and made a seam. A seam that would be covered later by the backing of the blanket.
STEP 4:
The backing of the patchwork blankie was just a large piece of fabric i found in the scrap fabric bag. I pinned the patchy part on top to hold it in place, and then sewed a seam on top.
STEP 5:
Once the seam was in place, I evened out the edges of the brown fabric backing, and then cut wide "fringe". Each piece of fringe was then tied into a knot at the bottom.
(this is the knot fringe after it was totally finished- see pic below!!!) Super rustic cute. ;)
FINIS :::::
I like it! I like it!
It was a little hard to do since it was my first time sewing something like this, but it only took me half the day. The hard part is just the tedious monotony of putting it together, not the actual skill it takes to make.
Totally worth the time! Wish I could keep it for myself. :)
Xoxoxo