Showing posts with label local organic cotton. Show all posts

Sunday, November 14, 2010

Eco DIY: Organic Cotton "Alf" Dress

Yeah, ya read it right... ALF! ha ha ha.
This sewing project is more of a minor upcycle deal, see ya' don't need "Alf" to make this dress...(even though you might think you do!) All you need is an old t-shirt that is nasty, doesn't fit, etc from your closet, grandmaws closet or the thrift store... a t-shirt with a whimsical logo that can be cut out and re-sewn onto a new outfit. I put mine on an organic cotton dress I made from some locally woven fabric. But you could do this with a hoody and put the old logo/character on the back.
THE BEGINNING:::
I pinned down my dress pattern on the fabric, which was the pattern I traced from another dress I already had.
And then chop chop! Cut out the fabric, leaving enough room for the side seams.
I had folded the fabric over, so that the front and back would be cut at the same time. I like efficiency... :)))
I left the pattern pinned on while I sewed in the seams along the edge... then unpinned the pattern.
I love making things adjustable! So I made the top of the 'sleeves' or straps the kind you can tie to any size....
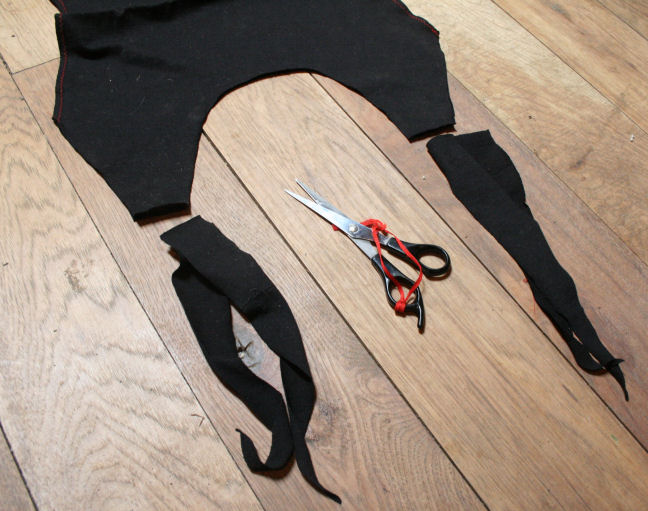
Once the organic dress was sewn together, it was time for ALF!!!
CAREFULLY pin your logo on, you want it really flat and even so that it doesn't wrinkle or bunch up the front of the shirt or dress or hoody or whatevs you may be sewing it on...
Then SEW! I used the basic straight stitch and slowly went around the circle of Alfness...
ALF HYSTERIA:::::
hysterical? lovable? weird? so was Alf.
You can wear it with or without a shirt underneath... summer time, or fall time...
party time?!? WWAD ? ;)

XOXOXOxox

Saturday, October 30, 2010

EcoWeen: DIY Native American Costume

It's Halloween weekend! YAY! Being that I was raised in the Mardi Gras culture down in New Orleans, I get really into costume making, probably more then any other kind of sewing project. Back home Halloween is almost like a mini Mardi Gras and the costumes are always elaborate, lovable, amazing, hysterical and just plain wrong. It's a bar raised too high & it's hard to live up to... but I try.
*
This year I decided to make a Native American costume (I am part native american) with a lil' Clan Of the Cave Bear flare (cause I just finished reading the whole entire book series!), but mainly I chose this genre because I have been collecting feathers from my chickens, rooster, the wild turkeys, and a few brightly colored ones given to by my awesome friend Heather....

THE HEAD PIECE ::::
I started making the head-dress first because that was going to be where most the feathers would go and I was excited to use them! I did not use any kind of glue, tape or toxic products to get my feathers to stay in place. I decided to sew them directly (and carefully) to strips of black organic cotton fabric (locally made here in north carolina!)
I attached a small jaw bone to the center front, and hung more feathers and beads from strings that reach all the way past my shoulders. (Gives it major dramatic style!) The construction is really simple, and just ties in the back of the head.
THE DRESS ::::
The first thing I did to make the body or dress part of the costume was to trace a shirt I already owned and fit me well onto some paper, in order to make a pattern. I drew (freestyle) the bottom half of the dress and then cut out the full pattern...
This is the pattern without the sleeves ( you can make it with or without sleeves.) I planned on adding in sleeves because I knew the weather here in the mountains would be cold for Halloween.
I pinned the pattern onto the velveteen bamboo fabric and cut out the back side of the costume...
This is the tedious part:::: I then CUT the pattern into three panels to make the design for the FRONT of the dress.
Each panel will be sewn back together, but I cut them separately in order to tighten up the bodice in the front.
These are all the pieces that need to be sewn together (pic below). I used more black organic cotton fabric as the strips along the front bamboo fabric bodice.
TIME TO SEW::::
I put all the pieces together and then cut out some black organic cotton arm bands to tie onto the sleeves. They are removable and I made it fringed by cutting strips into the fabric and pulling each fringe piece tight.
I also cut fringe strips into the bamboo dress at the bottom of the long sleeves, and at the bottom hemline of the dress!
DECORATION::::
You can never have enough. Period.
Once I got started with the feathers, beads and (real) bones it was hard to stop.
In fact, my cabin looked totally trashed by the time I was done with making this costume!!!!
THE END RESULT IS Fuckin' FIERCE!! ::::::::::::::


Drama, Character. It's what halloween is all about.

HAPPY HALLLLOOOWWEEEEENNnnnnnn!
Xoxoxox
*
Fabrics by:::
The Bamboo Fabric Store, see here.
Near Sea Naturals, see here.
*

Wednesday, September 29, 2010

DIY: Big Button Down Shirt Made To Fit

This won't be my most dazzling sewing project, but the idea of altering clothes to make them fit is a noble upcycle endeavour and I wanted to share my attempt. Taking a button down shirt that was too big for me (a men's medium), and sewing it down to a more fitted shirt my size.
*
My original idea was to somehow turn this into a mini-dress (i like to turn everything into mini dresses)... but it didn't work out since the length of the shirt was too short, and well.... you'll see...
SUPPLIES YOU NEED:
  • push pins
  • sewing skills (machine or needle/thread style)
  • thread
  • maybe a friend to help
STEP ONE:
I turned the shirt inside out and put it back on.
STEP TWO:
If you have a friend, have them put the pins along the right & left side of the shirt to make it fit to your personal curves, including the sleeves. Leave space for your sewing seams.
If you don't' have a friend over (like me) then carefully try and place the pins yourself - or use measurements. I hate measuring things so i tried standing really stiff and put pins in myself, but it wasn't as accurate as it should have been.
STEP THREE:
Sew along the seam lines you created with the pins.
AND....
You are already finished (or at least i am)!!! This would be great for making a new winter wardrobe on a shoe string budget, because thrift stores are packed with men's button down long sleeve shirts of all colors, patterns and solids which you could tailor to fit your body.
Funny Lookin' Fail ::::
I also did a lil' experiment with adding another layer of shirt at the bottom, which could make a really neat look if you have the right contrasting colors... which I did not. Stark white, with nice subtle plaid is a recipe for a terrible horrible no good country-fied look, but ya know what? I modeled the Sewing Fail for ya'll anyway.......
The Dolly Looks Better. (aka, this might work if ya have big boobies, sassy hair, and long tall legs. Being able to line dance & sing would help too.)
The Baggy Art-TEEst. (This look will work if you like your clothes swaying, loose, half buttoned and probably half assed.)
The Front Knot! (my personal favorite. This shit was hot in the 80's and we all know whether we like it or love it that pushing obscure 80's ideas is totally in style. Maybe not in my rural neighborhood {cause it never went out of style here}, but in Brooklyn, yes. Besides a front knot on a tight plaid shirt is so movie star country girl, roll in the hay - who doesn't like that? I am bringing this back to the fashion forefront right this minute.)
Maybe I can't win them all, but the whole idea is onto something good. ;)
Xoxoxo

Monday, January 19, 2009

DIY: Organic Fairy Costume

I know it's totally not Halloween... but in my home town of New Orleans an even bigger more flamboyant holiday is about to happen, MARDI GRAS! Growing up in the crescent city culture has given me a deep appreciation and maybe a little bit of an obsession with colorful, fun and sexy costumes- like the kind you see down in the French Quarter and along the parade routes. The native people of New Orleans will spend an entire year hand crafting some the most elaborate costumes in the world - stitching in every bead and sequin with great pride and love.

My Mardi Gras fairy costume is made of 100% organic cotton scrap fabric that didn't cost me more then $10 and although the project took some planning in my mind it only took one day to put it together! (Watch the How-To VIDEO on YouTube here, for more pictures and fun music...)


First I made a paper pattern to cut out the bodice with - make sure to measure your chest, waist and hip for this. After cutting out the bodice measure the length of the back and front bottom portion, so that you can use this to guide the length of the fairy skirt.
The skirt will consist of layered scraps cut approximately the same size each, then sewn to a long thin (1 inch wide) strip of fabric. This will make it easier to attach to the bodice after your done.
I wanted my costume to be extra dramatic by making matching wrist bands and a neck band- you can sew them in the same exact fashion as the skirt above! I didn't make any kind of clasp to close them, but just tied them onto myself since it blends into the scraps.
The back part of the bodice can be made into a corset top which I added a few inches of extra black fabric to the back middle - this is so you can tighten or loosen your costume as you put it on, or if you change weight (cause I want to enjoy this one for a long time!)
To add the corset ties, I cut tiny holes and used a safety pin to run the "laces" through. The laces are just stretched organic jersey cotton fabric.
Lastly I made two tubes open down the front for my legs and repeated the lacing pattern, in order to create faux boots!!! Cute!
This last pic is my 'in character' interpretive fairy pose! ;)
Good fairy or bad fairy? You decide.
xoxo