Showing posts with label wood oil. Show all posts

Thursday, July 14, 2011

Floor Oiling 'Ballet' !

Originally when i finished my woods floors, I made my own non toxic oil out of bees wax, walnut oil, salt and vinegar (cooked a lil'). Now when i want to give it a quick re-finish i go over it with just the walnut oil.

I do it by hand... usually on my hands and knees. This time all i used my knees for was the dancing, swaying, sliding, fun because I oiled the floor using my feet! I took two wash rags and two rubber bands and fastened it to my shoes. :)))
Slip N Slideeeeeeeeeeeeeee


XOxOXOX

Tuesday, May 11, 2010

DIY: Non Toxic Wood Oil Part 2 (The Floor!)

BEFORE PHOTO:

This is my bathroom floor before putting on the natural wood oil recipe I made - the wood is kiln dried hickory planks that were locally milled and deeply on sale...
If ya need the wood oil recipe, click HERE for Part 1 I posted earlier today---> cause this now is Part 2, and all it is about is my extreme excitement and OCD about how I could not stop putting this amazing wood oil mixture on everything in my house! I couldn't stop cause not only did it smell delicious but it also looked beautiful (I mean, don't oily wet lookin' floors always look so good?!)
Armed with a pot of the natural wood oil and a organic cotton rag I was ready to start rubbing it in. During this process I thought possibly one of those sponge mops would be alot quicker, and at least a good buffer for after the oil is put on....

But I did this by hand, totally Mr Miyagi style "wax on wax off danial son!"

In my bathroom I laid it on extra thick and waxy because I didn't want the water from the tub or sink to penetrate the floor - you can see in the pic below the difference between the finished wood and the unfinished dry wood. The oil brings out all the wood's character, grain and color, artistically speaking just that look is worth all the effort.
Once I got finished the bathroom, I was on a roll! I put on some more of the mixture to be heated up (walnut oil, salt, bees wax, apple cider vinegar) and then It WaS ON !!!
I went right out the bathroom 'door' (i haven't got around to putting up my door yet), and proceeded to oil the kitchen floor too.
Then the OCD my mother instilled in me (AKA- don't ever quit in the middle of a project or activity) kept me going right out into my living room...
And going......... (like, who could stop when it's looking that good and the fear of it drying totally uneven kinda haunts your inner wanna be perfectionist!)
Eventually I made it across the entire house and let myself off the hook, to do my bedroom tomorrow instead. The hardest part of this project was moving stuff on the floor outta the way and the thought of moving the sofa I sleep on made me rather go cook dinna' instead.

The oiling part, though = majorly fun to watch, a little like magic. ;)
XoxoxoX

DIY: Natural & Non Toxic Wood Oil


BEFORE :

Here is my kitchen counter (made of unfinished hickory wood planks) before applying my wood oil recipe...

In order to prevent alot of staining plus possible mold and mildew growth on the unfinished wood, especially during the summer months I decided to 'stain' or oil the wood with a natural recipe - one that was 100% non toxic, that would not out gas, and would be safe for those people who are sensitive to the chemicals in commonly toxic wood finishes.

SUPPLIES :
  • Bees Wax
  • Walnut Oil
  • S alt
  • Apple Cider Vinegar
  • Knife
  • Stirring Spoon
  • Pot to cook it in
  • Rag, sponge or some type of tool to rub the oil into the surface
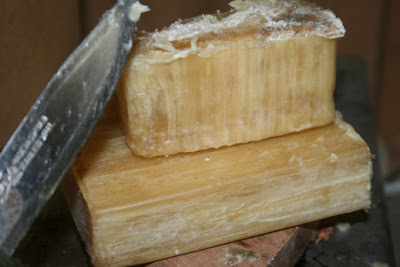
The first thing I had to do was cut a portion of the bees wax off, which luckily my friend Gabi gave me the awesome tip to heat up the knife first then cut into it "like buttah"...
Mine was super thick so, I had to re-heat it a few times until about 1/4 of the pound of wax broke and I had the perfect piece to add to my recipe.

NOTE: I recommend using bees wax and not a white food grade wax because of the coloring when it dries, and general coloring added to the recipe. Bees wax is also easier to work with and has a good smell!
ADD TO THE POT:

2-3 cups Walnut Oil, 1/2 cup Salt, chunk of Bees Wax, teaspoon of Apple Cider Vinegar... And bring to a boil till the wax is fully melted into the mixture and stir occasionally.

This is totally experimental amounts - if you add alot of wax the mixture will become so wax-y that it will be too thick a coating on the wood... if anyone has 'buffing tips' for a more wax heavy mixture please share!

After the wax is melted, rub it into the wood while warm...
Rub the wax in a buffing fashion, and be sure to not drip too much or lay it on thicker in various places... when using a mixture with wax you do have to be conscience of layering it evenly.
Looks awesome and smells edible.... but it could use a little extra buffing ---> so i am looking for suggestions of what would be a good material or tool to use for buffing this kitchen counter?
In the meantime, I LOVE it!!! I love it so much I can't stop putting that stuff on everything wood around the house. :) The bathroom floor is next!!!

Kiss This HOuse BEAutiFUL!
Xoxoxo

Wednesday, November 12, 2008

DIY: Non Toxic Wood Oil

When you have as many chemical sensitivities as I do sometimes not even the less toxic stains, paints, or varnishes will do. Many of them still contain harmful VOC's unless otherwise stated on the bottle with a seal of approval. The great thing about no VOC is it won't be outgassing half the year like most products but just when it's first applied & drying. I wanted even better then that though, I wanted to create a wood oil that never outgassed a single hazardous chemical! So when I had a raw wood table that needed some protection I cooked up my very own secret formula that has now lasted 2 years with no change.

Here is what you will need:

*Soy Oil

*Sunflower or Olive Oil

*Kosher Salt

*Vinegar (I use ume vinegar, but I think apple cider would work good too)

Doesn't it sound too simple? I came up with this theory/formula knowing about treated wood being mainly salt and oil being a time tested preservative for centuries.
Take all the ingredients and put them in a pot big enough to hold the amount you need (depending on whether you are doing wood floors or a chair...). You will use more soy oil then the others at approximately 50 -70% more in your recipe. Then add a ton kosher salt... meaning if you poured 1.5 Liters of oil in your pot, then you will want to ad at least 1.5 cups of salt. Then add a cup of the vinegar and bring to a boil. You want this to boil for at least 20 minutes or longer (the longer the better it seems), and then add a little more salt when you see that the first batch has dissolved in the oil.
The easiest way to apply the wood oil is with a sponge which will be able to be squeezed out and creates less waste. The cool thing is it won't harm your skin, your brain, or your lungs & it won't be outgassing any smell except one you might want to eat! If you would like to add a scent to your wood oil try throwing in a branch of lavender or rosemary.

I really believe there is a way to make what we need in a less toxic, chemical free way - we just need some imagination & to stop buying into the marketing BS of big corporations.