Showing posts with label seeds. Show all posts

Saturday, September 11, 2010

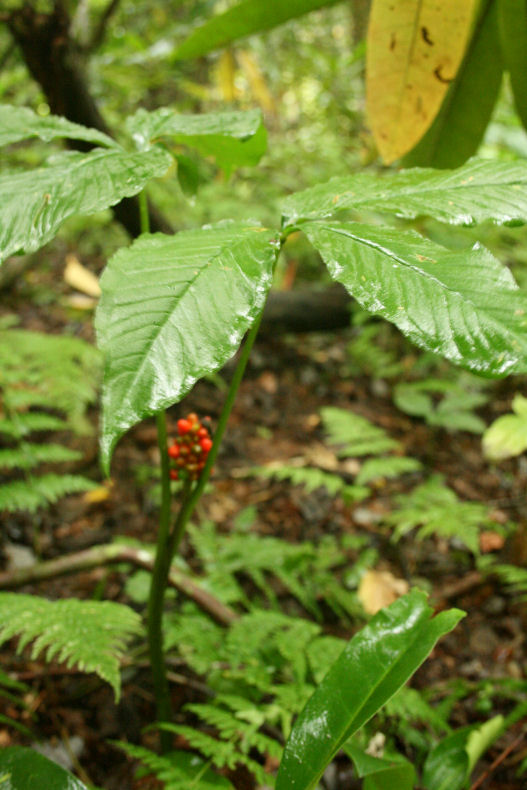
Wild Ginseng In The Fall (red seed berries)

Remember when I found some ginseng earlier in the summer? I have found more spots of ginseng since then, especially now that the seed cluster has turned bright red and is easy to spot in the green & brown woods. I won't reveal the locations where I found them (they are all different anyway) - cause in our area people will come and steal your ginseng to sell for a high price! Silly theives, don't they know we all have ole' shotguns out here in the woods. :)
Also, I have had several local old men already ask me if I knew where some was (does this qualify me even more for the neighborhood witch?)
The ginseng leaves are no longer dark green at this time of year, but are turning yellow-ish now and the stems are weaker. The berries are ready when they are loose and easily fall off if you lightly shake the plant - those berries are not for eating, but for planting. They contain the seeds to grow more ginseng plants.
I plan on spreading these seeds around to help grow more of this rare and over-hunted native plant. Then maybe one day I can dig up a root and not feel bad about taking what little is left in the forest.
THE FOLLOWING PLANTS ARE NOT GINSENG....
the following pictures below are native plants that also contain red berries that could be mistaken for the ginseng plant, when hunting for it in the fall. It is REALLY important not to get edible plants in the woods confused, to avoid getting sick/poisoning/ or death. Be certain you know what you are looking for by having a clear picture of leaf shapes, roots, berries, ect...!
Not Ginseng! (can anyone ID these other red berry producing plants?)
Xoxoxox

Sunday, September 27, 2009

When There's Too Much Rain...

Seeds I was meaning to harvest and save for next year are growing right on the plant! These are marigold seeds growing right out the pouch that holds them, because of the massive amount of moisture and rain we've had for the last few weeks. You can see in the pic below the bottoms of the seeds are all forming roots - pretty wacky!
This is a whole new weird weather happening I never thought of- if the plants going to seed start sprouting on the vine (as did many of the beans too) because of unusual amounts of rain then it's difficult to save seeds for the next season.
XoXOooo

Thursday, September 10, 2009

Mammoth Sunflower Seed Heads

Holy Taleedo! Remember my leaning tower of sunflower? Those bad boys went to seed, and man their heads got huge. ;)

Seed saving is so much fun!
PS- Anyone ever roast their own sunflower seeds before, I am open to some tips?!

XoXo

Tuesday, September 8, 2009

Seed Saving: Organic Zucchini

Wanna see something HUGE...That is one of my 2 BIG 2 be true organic zucchinis I grew this year! Trust me when I say I made zucchini everything this summer - soup, bread, baked, for breakfast, for lunch, for dinner, for every meal. Zucchini is best eaten when it is younger, as the veggie grows the plant begins to go to seed and the skin toughens till it gets to a not so edible stage in it's life cycle. For collecting seeds it's good to let one (or more) of your zucchinis grow into a huge monster that would make a porn star cry (see pic above) - let it stay on the vine until the plant dies back. After I picked the obscene seeding zucchini off it's dead vine I let it sit out in the sun to 'ripen' up and harden. You can see there's a group of roving gamblers chilling out on some of mine. That's a gang of garden killers conspiring together -cute but very unnerving. ;)
Carefully open up the zucchini close to the middle but don't push your knife all the way through unless you don't mind having a few casualties. The seeds sit right in the middle, so gently pull it apart and scoop it out by hand, (just like with winter squash).
Stick them on a dish, cutting board, unbleached paper towel or some other surface for drying - be careful not to let them sit out too long and re-moisten after drying, which might cause mold. Spreading them out helps faster drying, not like I have them in the pic below. :)
YAY seeds!

XoXOoo

Friday, August 21, 2009

Seed Saving: Moon and Stars Watermelon

This is the first year I have successfully grown watermelon in Western North Carolina! Even if I only ended up with 3 watermelons total and one was pretty deformed. In fact the one pictured here had the Quasimodo thing going on, on one side that I decided not to reveal to the public eye. Being a disfigured watermelon does not effect taste though, and holy toodles this thing was sweet and delicious! I literally just spooned it out, bite after juicy bite while setting the seeds aside for next summer's attempt at growing.
The inside had a pretty white vain pattern, reminded me of decorative architecture & iron work in the french quarter part of New Orleans. (Gawd I miss all the artistic & flamboyant passion of my home city!)
Once the seeds totally dry out I will most likely re-use old seed packets for storing the new seeds, I always save them just in case (trying to save some landfill space!). :)
XoXOoo

Tuesday, August 11, 2009

Seed Saving:Organic Yellow Squash

I let a few of my organic yellow crook neck squash go to seed this year. This is the first time I really let summer squash go to seed and I was really excited to open up those bumpy, big bad boys! When they stayed on the vine they got very textured like a gourd and the skin became hard like a winter squash. I picked them a few weeks ago and then left them in the sun to mature and dry some more. I cut them open today and pulled the good seeds out, placing them on the wooden chop block to fully air dry.
The seeds to save are the ones that are fully formed, mature, hard, and pretty thick. If it's limp and empty on the inside then it's not going to ever do anything. Just one or two squash can yield a pretty high amount of seeds - which is a great money saver for next year's organic garden!
PS- look at my cute little pie pumpkins in the background! Mmmmmmm.
XoXo

Wednesday, August 5, 2009

Green Bean Seeds: Pluck and Shuck

My organic green bean plants are pretty much done, as far as eating goes - but what I did this year was let a bunch of them go all the way to their very end...to seed! Green beans only taste good in their teen stages, once they become adult beans they get tough and stringy - and bulge a little. The bulge is the beans going to seed, which is the absolute best way to save money on organic seeds for next year's garden. The ones that are most ready I plucked from the vines and then shucked the hard beans out of them by hand - then I put them on a wooden cutting board to finish drying out. This is to make sure they don't mold & keep them from getting wet or sprouting.
* Does anyone have any other ideas on the best way to collect bean seeds?*
XoXOooo

Wednesday, June 24, 2009

Organic Seeds On The Cheap

I am all about getting the most out of my organic food - not just by stretching meals but also by replanting & gutting some of those veggies to get seeds out of them. Check out this neat little trick... I take the bottoms (with the roots attached) of onions, the tops of turnips, rutabaga and parsnip, and the thick stalk bottom of a cabbage and I stick them in the moist ground.
The magical thing that happens, like in these pictures, is that the plant takes root and continues it's process of life. How unstoppable and rad is that? Once they get in the dirt they just keep on going where they left off, which is usually right before they were going to seed - you end up with pretty flowers, some extra edible greens on top, and after they've been pollinated and dry out you have yourself more then a pack's worth of organic seeds!
*Pictured at the top is an organic purple cabbage bottom that grew to make nice muted yellow flowers (for seeds), second is an organic turnip which if planted later in the summer goes right to seed but in the spring will make you HUGE turnip greens first to eat, and the last picture is the root of the (organic) red onion planted in the ground which makes these delicious green stems (great for stir fry and cooking with beans) plus goes to seed in the shape of a beautiful round ball of tiny flowers.*
One more seed tip: For a grand variety of winter squash & pumpkins, simply save the seeds from the (oh so expensive) organic ones you buy at the store. Let the seeds dry out on a plate or napkin, then store them for next year... 2 little butternut squash seeds can make you over 16 more butternuts to eat- that is bang for ya' buck!
xoxo

Wednesday, June 10, 2009

Bean Seeds: Buying and Planting

Buying beans in seed packets doesn't really get you all that many beans, especially if you are growing a garden that is supposed to feed you throughout the year. The neat thing is you can go to the bulk section of your organic grocery and load up on dried beans because those are the actual seeds for planting bean plants too. Ya end up with WAY the heck more bean seeds for crazy less money then buying small packs. You also get to choose from a huge bush bean & legume assortment not offered in seed catalogues, plus they'll be certified organic. :)
These won't come with instructions but generally speaking most bush beans only need to be planted 2-4 inches apart, and just give them a good cover of dirt not more the 1 inch deep. Watering seeds as you plant them can give um' a head start on germinating and just kinda seems like a nice thing to do for ya new little ones. This year I am growing kidney, black eye pea, mung, lentils, great northern, pinto and christmas lima beans...another reason to love bulk bins at the health food store. :)

XoXo

Friday, May 29, 2009

Herb Starters, Wanna See My Babies?

I think I may possibly love growing herbs more then vegetables. This isn't to say I don't love growing veggies but just something about an herb's ability to give to every meal, that steady and unfleeting life gives it a more personal appeal (long term relationship style). I have been planting herb seeds in starter pots and then slowly moving them into my organic garden spaces... so here's introducin' a few of my babies!
***
First, dis' is my babie Basil... a fancy kind too that I can't remember the name of. :)
And here is my babie, little Garlic Chive...
My very favorite babie herb is Sage because the seed isn't planted in the ground but is just placed on the surface of the soil, then becomes the strongest woody herb bush with fantastical purple flowers. Mmmm.
XoXOooo

Wednesday, March 18, 2009

Gardening Time: Start Some Seeds

When I picked up some organic seeds yesterday at the store I could tell I had been going through gardening withdrawals. Knowing it would be too late to start my usual early crops by the time I relocate to Big Sandy Mush, I could feel my hand holding packets of cool weather radishes & snap peas shaking like an addict - the smart voice in my head saying "Put it back Leslie, be economical, plant during the right season, just put down those seeds..." Instead I grabbed a ton of veggies and herbs that will be perfectly timed with my move, but since I just couldn't wait to get my hands in the dirt (mmmm, dirt smells so good) I decided to go ahead and do a few starter plants.
Most herbs do great as transplants and can be started ahead of it's natural season. Veggies can be hit or miss but I went ahead and tried planting some Moon and Stars Watermelons (click that highlighted link and see how freakin' pretty those watermelons are!). All you need to get your plants started are dirt, something to stick the dirt in, seeds, hands or a shovel, and a good gardening buddy (see pic below!) After I filled my trays with some soil, I sprinkled chicken poo compost over all the dirt. Giving your organic seeds a good start makes a stronger plant - but be careful not to blast them with too much enhancement which in my opinion can create a weaker plant as it grows.
I buy only organic seeds because these are not genetically modified, they are free of chems, they are mostly heirloom, and they make much stronger plants with better bug resistance. Any plants I grew from non organic seeds always had worse pest & fungus issues, and somehow feel like it's a conspiracy seed that forces people to think we need to spray our food with nasty chemicals. Which is gross.
I really hope that this isn't the face I make when I am gardening... maybe I hope this isn't a face I make regularly at other humans (any friends or relatives out there to confirm this!??) It's a good idea to label which seeds are which, especially if you are a beginner gardener so you can know what to plant where - a must in companion planting!
Keep those little guys watered regularly for quicker and healthy germination. :)

Happy Gardening! xoxo

Thursday, September 18, 2008

Grow A Fruit or Nut Tree

I confess that I have a bit of a seed saving obsession. Everytime I find seeds inside my organic fruits and veggies I feel like I struck gold...possibly this is some deep biological farmer instinct, maybe it's in my DNA, or most likely it's from reading lots of self sustained farming books. I love growing trees from seeds I save from my fruit and nuts- this little proud guy pictured here is a apple tree! I have planted bunches of trees everywhere I lived, cherries, pecans, peaches and a variety of apples. It's totally organic & easy to do: When you eat an apple, just pop out the seed and stick it in some dirt, keep the dirt moist & thinly mulched...and wait for the joy of your tree seedling to pop out! If you want to try a peach seed, then soak the hard hull in some water for a day then crack open with a nutcracker and plant the almond shaped seed loosely under the dirt. For nut trees, just stick some nuts in their shell down in the dirt (pine nuts and pecans grow really easily).
These are my favorite to plant because I know they will be giving back and feeding people later on. :)

Monday, May 26, 2008

How Do You Get A Peach Seed Out A Peach Pit?

I got soooo excited when after I ate an organic apricot I popped open the pit with a nut cracker and out flew the apricot seed. I immediately filled a pot with dirt and leaves and planted it, then was on to the next piece of fruit. But damn, peach pits are like rock walls around the special prize (a little almond shaped seed), and if only it took three licks to get to the center of the peach pit! (Don't try that at home, it's poisonous.) I pushed, I chipped away, I tried to be all zen and meditate the seed out of there - but to no avail. How DO you get the seed out of the pit?
My new experiment is to soak it in a jar of water into a weak walled oblivion, so that the nut cracker will magically open the soggy pit with ease. Think it will work?
Does anyone have any suggestions?