Showing posts with label sustainable. Show all posts

Tuesday, March 22, 2011

Duck Eggs Too!

This is so fun! This morning I went out to see if the chickens had left some more eggs in the nesting boxes... when i noticed a little nest built underneath. When I looked closer I realized my lady duck has started laying some eggs! The brown ones in the basket are the chicken eggs, and the white ones, only slightly larger in the ground nest are duck eggs.
So amazing, i did not gather them up yet, the nest with it's two eggs was so beautifully made, so beautifully set... and I have more eggs then i even know WTF to do with.
But of course, i am going to have to do a taste test ASAP, i have never eaten a duck egg before!
*
You can see only the slight difference in the chicken and duck eggs, in the pic below:::
(duck egg on the left, brown chicken egg on the right...)

XOXOxooox

Wednesday, February 2, 2011

Sexy? Root Cellaring

Ok, before I get started talking about how cool & sustainable root cellaring is...
and before i admit I haven't even read the whole book....
is it just me or is this the sexiest little sustainable book picture evah (see below)??? It makes root cellaring seem, downright HAwt!
Seriously! Sexy root cellar building man drawing, with lady drawing helper watching on as she leans on the cellar shelf... their posture! OI!
.......................................................
On the serious side.
This is a neat book, that shows lots of ideas on how to store all your fruits and veggies WITHOUT electricity, aka- no fridge! Aka, post zombie apocalypse. AKA, doesnt matter if the power lines come down in a bad storm. Aka --- I dont Need YOu GrOcerY!
Alot of projects don't require any building, but more of digging and storing things in the ground. Kinda like you are squirrel.
My favorite part that i found in this book is the buried old fridge... no need to plug it in, just bury the thing (after removing a few components) and have the door open at the top like a root cellar treasure chest!!!
(They shoulda put the sexy drawing people in this pic too..... )
*
Check out this book, HERE.
*
XOxoxox

Friday, January 14, 2011

Fixing My Spring Water... In The Dark

XXXXXXXXXXXXXXXXXXXXXXXXXXXXXXXXXXXX
Most of ya'll know by now, i have been having every water problem thinkable since winter started. The last few days I had an increasing problem with sediment coming from my outside pump (cause of course my inside water has been frozen for weeks)- there was not just a lil dirt in my drinking & cooking water, but a dead salamander so decayed it's legs were gone, large pieces of bark and leaves, and the clincher that sent me out into the night... little shavings of plastic with bits of plumbing glue on it (somehow from back when the piping was put underground.)
I will drink salamander decay water ANYDAY over plastic!!!!!
----------------------------------------------------------


xoxoxox

Saturday, November 13, 2010

My Gravity Fed Spring Water System (in the real!)

Ya'll might remember back when I first moved into the Luck Cabin, that a critter had pooped in the main puddling area of my gravity fed spring water. Not only that but the original system had all the piping (landscaping pipes) above ground which had cracked from harsh freezing temperatures in the winter, making the water pressure nearly nothing. The tank was also a small barrel that had some leaks too... with all the squirting water and the poop prob I had the system re-made this past Spring season, using the same spring water spot!
*
I wanted to make sure the pipes were deeply buried so that they would not crack in the winter (5-6 feet), and a big tank put in that could catch sediment (at the bottom naturally) and wouldn't leak unless the water overflowed the top of the tank through a pipe (called an 'overflow').

**This all could have been done with back breaking digging man power, but I needed water right away and had some dudes use a bobcat machine to get all this in place.**
The spring water source was also 'boxed in' between the rocks it was flowing out of to keep out animals... with just cement in the front and tin roofing on top the larger rocks that existed there already.
My main concern was that if all my house pipes froze that I would still have water easily accessible down at the cabin, and this was solved with a non electric water 'pump' of sorts that won't freeze in the cold, and pushes the water down underground till it's ready to use. (Watch the video below to see how easy it works, and how much water pressure blows out tha' thing!)

To Make a Gravity Fed Spring Water System You Need::::
  • Water source
  • Tank(s) to catch the water (more tanks create more pressure)

  • Pipes to get the water where ya want

  • Digging power to bury pipes & tank in colder climates

  • Ability to connect it to your house plumbing

  • Something simple to 'box in' the source if critters might be a problem
***
Here is a walk through vid I did today of the improved water system...
(guest appearances from JuJu the donkey, the chickens and my neighbors dog!)


Xoxoxxo

Wednesday, November 3, 2010

Spring Water + Old Sink = Fresh Water Container For The Animals

In the fenced in acre where my animals live there are two spring water sources (plus I have a rain barrel I am setting up at the mini barn!)...
I found a nice lil' sink underneath my cabin that I thought would be perfect for catching the spring water that had already been piped before I moved here. I settled the sink into the dirt and then took a handful of thick native clay (that has been dug up when building the barn) and shoved it into the drain to block the water from leaking. (I have tried this trick even with leaky buckets and had total success!)
Me and JuJu the donkey waited for it to fill up completely, drip by dribble for about 30 minutes.
Once the sink was full I had it lean slightly to the left side so that the water would overflow out in one spot... since it's spring water that constantly flows year round whether it comes out in a pour or a drip.
Before even pimping it out with some rocks, leaves and hay, the chickens came by to test it out...
Rooster approved.
I put a larger flat rock under the drip, and smaller rocks around the entire sink to make it sturdy. I also started covering the black pipe I had dragged under the fence with debris just to make it look like it's not there. Would be cool to make a second water pool with some rock and clay only under the drip.
This sink will ensure that no matter what the animals are constantly getting a flow of fresh spring water that has no contaminants in it of any kind (including their own poop.)
Yay, I am feeling clever now. ;)
PS - I got the idea to do this with the sink after having BAD dream last night that something happened to me where I couldn't get home & my donkey had no water and became very sick, I was crying in the dream because I thought she was gonna die of dehydration. Nothing like a lil' nightmare to get you extra motivated.
Xoxoxo

Monday, November 1, 2010

Watercress, from grocery to pond

When it comes to food and saving money I can be one of the most oportunistic shoppers ya eva' met. Not that I am the lady who pulls out all the coupons and holds up the line cause the half of them are expired- I am the lady who is secretly looking for produce that will keep on giving. Produce with seeds in it that I can plant (winter squash, apples, pears, avacodoe), root veggies (like turnips, rutabaga, radishes, beets) I can put the tops back in the ground to later eat their greens and get seeds from them after they flower, I even plant the bottoms of my onions and eat the green stems that grow back out.
My latest grocery find though has me majorly stoked! Watercress... organic watercress being sold not at the health food store but at the regular ole' grocery... watercress that still had it's ROOTS.
*
I bought the watercress straight up to plant in my pond, mushy spring water spots...
I searched around my pond for a good soggy place to plant those roots in the ground, in hopes to have watercress growing in bunches over the next few years.
I dug a hole easily with a stick, you can see the water seeping into the hole...
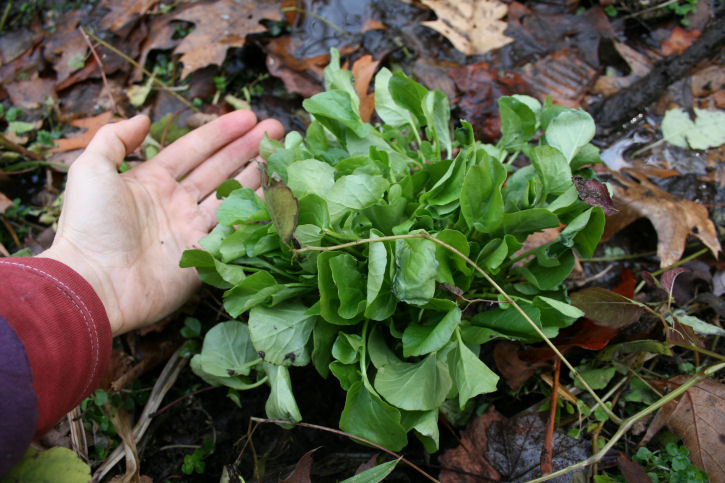
Looking bee-U-Tee-ful... now i can pick a few greens off to eat and let the rest make a home here.
I love LoVe LOVE grocery items that keep on giving. :)
Do any of ya'll do this too, with grocery foods?
UPDATE:::
Thanks to oko box reader Jason for pointing out that this is a different kind of Cress then watercress, it's called * upland cress * and does not grow in the water like watercress. It grows on land.
Go to Jason's Blog, he has cool as hec pictures of animals he caught on one of those special motion cameras!

xoxox

Friday, October 29, 2010

Hand Washin', Hang Dryin'

*
There are several alternatives to using an electric powered washing machine... all of them have their specific design benefits, but one thing they all have in common is you no longer depend on the grid (aka electric energy) in order to get your laundry squeeky clean...
I happen to have the Lehman's Hand Washer (which is almost the same exact design as the well known James Washer!) Whenever anyone comes over to visit at the Luck Cabin they love to see how the Hand Washer really works - children are especially into it (i know, shocking!), they'll beg me for more laundry to wash. I bet you parents out there don't hear that often (ever?)!
*
Here is a quick vid to show how the hand washer works in the real. I included some deleted scenes at the end. ;)
*


PS --- I could not get this video to ever edit captions and sounds in sync, so I had to leave out the captions... the last four scenes after "the end" are the deleted scenes. :))) Eventually I will figure out this technology shit.
Xoxoxox

Saturday, October 2, 2010

Hen Sitting On Ducks Eggs

My uncle loves raising ducks and chickens, and yesterday he dropped off a pile of duck eggs to see if any of my chickens would sit on them and make um' hatch. Why ya might wonder?
Well, humans have done things to animals, something called domestication... in fact humans went so far as to only breed over and over the traits the *thought* were the best. They bred the chickens so much that most hens have totally lost all instincts to sit on their nest, sadly some ducks too. It is now a rare bird who is willing to set, and the only way he has been able to hatch some baby ducks is to shove the eggs under a rare setting hen.
So I snuck some duck eggs through the back hatch in the barn/coop where the hens lay their eggs... (see pic above)...
One hen sits in the nesting boxes all night and her name is Skinny Minnie. She seems to sit alot, and prefers it to sleeping on the roosting branches- so my fingers are crossed she will somehow get a glimmer of maternal instincts and just warm them babies up!! Cause oh my gawd, everyone knows baby ducks are SOoooOOoOOoOO f'en cute, I could die just thinking about their fuzzy wittle selves, their quack and swimming, floating, riding the ripples.
Rootin' for Minnie to have some instincts & duck babies. Yeah, it'll be confusing that her babies like to swim and have big beaks... but hell a good mommy overlooks their ugly ducklings and excepts that the times are a changin'.

XOXOXoxo

Tuesday, September 28, 2010

Rain Barrels To The Rescue

This is my friend Paul Van Heden. He makes really pretty, cute, fun, fancy artsy rain barrels here in Western North Carolina! Today he came over to drop off two hand picked & painted barrels so i can start collecting rain at my cabin, and most importantly at my mini-barn where JuJu the donkey and my chickens live. I have a small spring coming from underground where the animals stay, and also spring water I fill up in buckets at my cabin and drag down to the barn, sloshing water on my jeans and down into my shoes all along the way. These rain barrels will make watering the animals a hella easier...
And seriously... aren't they cute? Nothing wrong with a ridculously adorable & eco friendly rain barrel!
These have two holes at the top with a net over them, so I have to set up a gutter/down spout to direct the water into the tank... until then it'll be all about getting the right aim in the rain. :)
*
"One inch of rain on a 1,000-square-foot roof will yield around 600 gallons of water, the average American uses 100 gallons of water per day." (water conservation)
*
We give these water barrels two thumbs, hooves, claws, and paws up!
Xoxoxoxox

Sunday, August 15, 2010

Re-Painting My Cabinets With Milk Paint

I finally got around to painting the old cabinets that were here in the Luck Cabin, although they were not fancy/special I decided they were still functional & good enough to use. I even liked the color variations painted on them, but now that I have discovered the fun, bright and non toxic colors of milk paint I can hardly help myself--- i wanna paint EVerYthinG!
*
BEFORE THE MILK PAINT :::::::
*

The cabinets were originally all in one weird kitchen set up - which I broke up into two rooms so that the Luck Cabin could have a bathroom. I left the cabinets where they were on the walls and included them in the rooms they ended up in. :)

*

PAINTING WITH MILK PAINT::::::

*

I took all the cabinet doors off and painted them "salem red" (see top pic)- using the Old Fashioned Milk Paint Co.'s earth pigmented powders meant for covering up prior paint jobs, called Safe Paint. The safe paint is the same formula as the original & ancient milk paint recipe, with variations on the quantities of ingredients - this makes it so it is stronger, richer color, mold resistant, and can be applied over old toxic paints, glass, metal and plastic!

For my cabinets, I wanted a fun nature themed design added- so I decided to add silhouettes in "federal blue" against the brightness of the red. I used a sharp matte knife blade to cut them out of magazines and computer printed pictures.
Once I had them cut out I verrrrry carefully applied the paint through the cut out picture, making sure to hold down tight each little portion while applying the milk paint with a sponge brush. If you use something more stiff to trace and cut out your shapes you don't have to be as rigid, but with paper cut outs, the paper may stick to the paint, so it's important to go slow.
WaY Freakin' COooooL !!!
Each door has a different animal, and one has a tree! My bathroom is native animals and the kitchen is more exotic themed. :)
*
AFTER THE MILK PAINT DRIED :::::::::
*
LOve it! I can not really recommend this kind of paint enough - I dont know any paint that can do a job this beautiful that also has ZERO environmental effects on water, soil, nature etc... it is made from entirely natural sources, that I believe makes milk paint as clean and eco as it gets.
PS- I know my kitchen is kinda a mess, I swear I cleaned it up after I took this! ;)
Xoxoxoxo

Thursday, June 17, 2010

Sustainable Living, Party For One?


In the pic above, that's me working on my gray water system which will filter all the water coming from my kitchen & bathroom sink plus my tub. I was lucky enough to have someone dig the hole when they were already around doing work with a back hoe machine... otherwise I planned to shovel the 10 foot by 4 foot, 12 inch deep hole myself with a shovel. Now I am working on shoveling gravel into a wheelbarrow then bringing it down to dump into the hole, then raking it out evenly... for a girl who weighs about 100 pounds, this shit is no joke!
*
The harder I work towards becoming sustainable, natural, eco friendly, & off grid the more I realize how difficult it is to achieve these goals by yourself. I have often wondered if working towards a functioning eco home on my own is a historically impossible task? The thing is, I have needed people, lots of people's various talents, skills, advice, a helpful hand - enough that it made me think how humans used to function before modern life allowed us to splinter into strong independence. Not true independence, but one that allows a person to do their entire life without another person around to lend a hand - grocery stores provide food, walmart type stores supply basic needs & then some - there is nothing a person can't buy, everything to "survive" is provided for. The independence is still on others to provide these things, but the comfort & illusion of doing it all yourself is there. (This is the kind of junk peek oiler's and apocalyptic folks love to brood on, the implications for those dependent on the system if it was to fail...leave ya rants in the comments section ;) ...)
*
For me, I knew going into these projects they were going to be rough (yet fun) and slow going to create alone, I knew that humans naturally throughout history worked at living sustainably in tribes. People split up the tasks, everyone had their skill, and lived without needing money - the independence was from not needing help outside the tribe, but no one was or is truly independent (if ya know someone I am super interested to hear all about them, and tell them to come ova' my house and teach me how to do it!).
No one does everything alone, and I am realizing in order to set myself up to do it all alone, I am needing a pretty good amount of outside sources to help me achieve this. And alot of time during the first half of my life where I would have traditionally learned skills (but instead was stuck in school learning nothing I use except for reading and writing), I am now trying to do an entire tribes' job and learn every skill possible to survive independently, without hardly a soul to teach it to me. (we all know 'self taught' can take more time, it's a bit like reinventing the wheel.)
*
When people come over to my cabin to do a job (like cut a tree, build a wall, work with stone), I am the equivalent of a puppy dog following them around, watching everything they do, asking questions, trying to pick up even the slightest hint on how to better use a tool, how to repair, build, think, measure... apprentice to everything, master to only being an apprentice.
*
So for the modern woman (or man) who's dream is do to do what I am doing out here at my Luck Cabin, going at sustainability alone --- I want to say ... HOW Awesome Are WE? And how F-en crazy!
*
The goal can not be total independence, but rather just plain ole' sustainability --- and for me I think I have been getting them totally confused. Gawd and baby jezuz, help my reclusive soul cause here comes my first union with community.
xoxoxXo

Monday, April 5, 2010

Wednesday, March 31, 2010

Putting Together My Hand Washer

Today I decided to put together the Lehman's Hand Washer i got! This is a clothes washer that is powered by your own arm & some water - but it is much larger then the Wonder Wash that spins a 2 pound load- this big boy hold 15 gallons of water, so that bigger things like sheets and blankets can actually be cleaned by hand too.
I have to say, I am not good with directions (aka, putting shtuff like dis' together kinda throws me off)... and even though it was fairly simply to figure out the directions were way too vague without any pictures. I basically went on intuition...
There is a hose attachment at the bottom, so that drainage of the water can be turned off and on - what makes this feature cool is you can move the washer to anywhere, since it's not plumbed into the house. You could wash clothes on the porch, in the bathroom, or anywhere ya want.
I bolted in the first set of wooden legs, and soon found out that plyers are needed to tighten the bolts and nuts together.
I ran into a problem on the second set of legs- the layers of metal holes were not matching up right, no matter how hard i pulled, tugged, pushed, and cursed at it - once i struggled to get one bolt in, it was impossible for the second series of holes to line up. I took my drill, put oil on the metal and drilled some of the metal out to make the hole more even... then got the leg on.Once both sets of legs were secured, there is a support bar and rod to put through the bottom holes. It definitely made the washer solid and sturdy.
I popped on the handle and the clear plastic top! All done and ready to try it out!
XoXo

Tuesday, March 9, 2010

Electric Bike Ride Part 2

This time... I think I got it right. But the first time it went all wrong wasn't my fault! Turned out that after about 4 miles of fun on my first ride, my electric bike motor was broke as a joke, and the whole bike had to be returned to the manufacturer, Liberty Bikes. I just want to note that the company was extra helpful, nice, informative and good with trouble shooting via e-mail... AND because my bike broke they sent me a brand new electric bike to replace it!!! It's the same fold up model as "peewee" was... but this one is their newest version and let me just say, it is way more pimped out.

Now it's got a back red light & more reflectors for night ridin' , a snazzy side logo in red, a upgraded rack on the back, a hardcore lock in kick stand, and improved bike seat ---- and best of all on my very first ride on this new bike the chain never fell off, the brakes were not jumpy, the motor didn't die, and the battery gauge didn't do that half empty thing while going up hill. The new bike is way peppy!
Here are some things I saw along the way....

XoXo

Monday, February 22, 2010

Composting Toilet: Potty Assist

Imagine this: Two men hanging up a grey sheet and placing a small square box underneath, then lifting a composting toilet in a big hug to place it up on the grey pedestal created and shooting some hawt photos of it.

Ya'll know how I love the humanure toilet system (simple potty in a bucket & cover with leaves and compost it), so much more then the mass scale sewage treatment plants and soil wrecking septic systems in rural areas.
In general the reason I love humanure toilets the most is you can build one for under $25 (we built one for $7 here in Big Sandy Mush) - while most other systems will cost you gobs more. In reality though many people just can't get into "roughing" it with such a homemade toilet system, and this is where the fancy composting toilet steps in. I have done quite a bit of searching, reading and observing of composting toilets that are manufactured over the years - I am the kind of nerd who would drool over the SunMar Compost toilets in the Real Goods Catalogue then look at the prices and wipe away my drool, shuffling over to my regular ole' septic toilet. I actually listened to neighborhood composting toilet gossip too "you know my friend so-n-so, he has a wife and three kids and he said the compost toilet stops working in the winter cause it gets too cold, the microbes don't work" or "you have to aim your pee cause you can't pee in the poop hole" ect...
And to be honest all this talk of having to add microbes you had to buy in a jug, and aiming pee was a big turn off for me - I just rathered the simplicity of Humanure via leaves.
Till i found this baby pictured above ::: The Nature's Head Composting Toilet.
Humanure simplicity meets composting toilet design. Yeah, I know it looks like something built for the nursing home, like some kind of potty assist chair, but in the world of composting toilets this one is looking like the freaking Taj Mahal - with it's fancy stainless steal parts meant to not rust in a wet environment, and it's almost regular toilet shape.
So here's some things I like about the Nature's Head composter...
  • You can use peat moss or leaves just like in a humanure toilet (your not forced to buy microbes)
  • You can add a solar vent to it and have it utterly off grid, or vent it with a fan
  • It separates your solids and liquids, meaning no need to aim your pee (I know cause i wrote them and asked!)
  • It's made totally in the USA
  • It only needs to be bolted down, AKA you need no plumbing skills to install it
  • The whole unit costs $850, which is about 1/4 of what you pay to put a septic on your land (not to mention you can put this thing in an RV, boat, or wherever you want to go from then on. Your own to-go toilet.)
Do any of ya'll have a composting toilet, and if so can your share your gossip - the design perks and flaws?!

XoXOoo