xxxxxxxxxxxxxxxxxxxxxxx
Rice milk is killing my bank account. I love it, I drink it everyday, and when i don't have it it's all i think about. It's my addiction and since it's a healthy one I thought it was about time to start making my own - (like when a meth head realizes they can make their own meth lab! Except that is not healthy and they have to condemn tha' house after.)
* Since I found videos easier then the recipes online, I made a lil' vid showing my first attempt at making rice milk at home!
* This probably cost me around $5-10 dollars, to make 1.5 gallons of my own rice milk... when buying amazake 2-3 small drinks would cost me as much! I have no idea why companies charge huge amounts of $$$ for rice milk since making it actually doesn't cost much and a big part of the recipe is just water.
SUPPLIES YOU NEED ::::
*rice (brown is healthier)
*water
*Sweet Options: sweetener like honey, maple syrup or rice syrup, etc...
*Flavor options: vanilla, almonds, and/or other grains you can tolerate
*Pot, Spoon, Blender, Strainer (cheese cloth or stainless steal)
Do ya'll have any non dairy milk recipes? I would love to hear them! Almond, soy, and gang!
xoxoxox
Showing posts with label cooking. Show all posts
Showing posts with label cooking. Show all posts
Saturday, April 2, 2011


Monday, March 28, 2011
FAIL! Seasoning My Iron Waffle Skillet
 Um. I dont know what went wrong with seasoning this thing, but here is what happened : My mom sent me this awesome cast iron waffle skillet, that you can use on any hot surface! No electricity required - you can cook on top your gas stove, wood stove, probably an open fire. So... it came unseasoned, ya know... without the blackened oiled non stick natural surface it acquires after use. So i pulled out the pamphlet and read that i had to oil it and then put it in the oven to start the seasoning. Ok. Not too hard, I hoped. So i put olive oil all over it and stuck it in my toaster oven. It wasn't long before I turned around to see what the fucked up smell was, that the whole cabin was filling up with a heavy thick white smoke!!! The waffle skillet had some kind of waxy shit on it ( i thought i felt on it but wasn't sure), that had to melt off and so I assumed the smoke was the wax burning... i had no idea it would pollute my house so bad! ...... so i tried something else.....
  At this point I figured most the mystery wax must have been gone (mostly now in my lungs and cabin ceiling)... so i let the oil sit in the skillet for a few days, thinking maybe it would absorb. But it didn't. Then i stuck it on my wood stove since i had a fire going and it was majorly hot. It still made really bad weird smells - but no smoke so I was cool with the mildly donut shop/mildly metallic/mildly 'what is that melting' stench. BUT then THIS HAPPENED!!!!! Look at these pictures! (above and below!) .... OMgawd, this is not was it is supposed to look like. One side of the skillet turned all orange red and looks not at all seasoned. The other side, WTF is that gelatinous substance? It's got a red black tint, and it's not even flowing while warm - it's like a goo. Like hot stable iron & wax flavored jello... or maybe chapstick?
 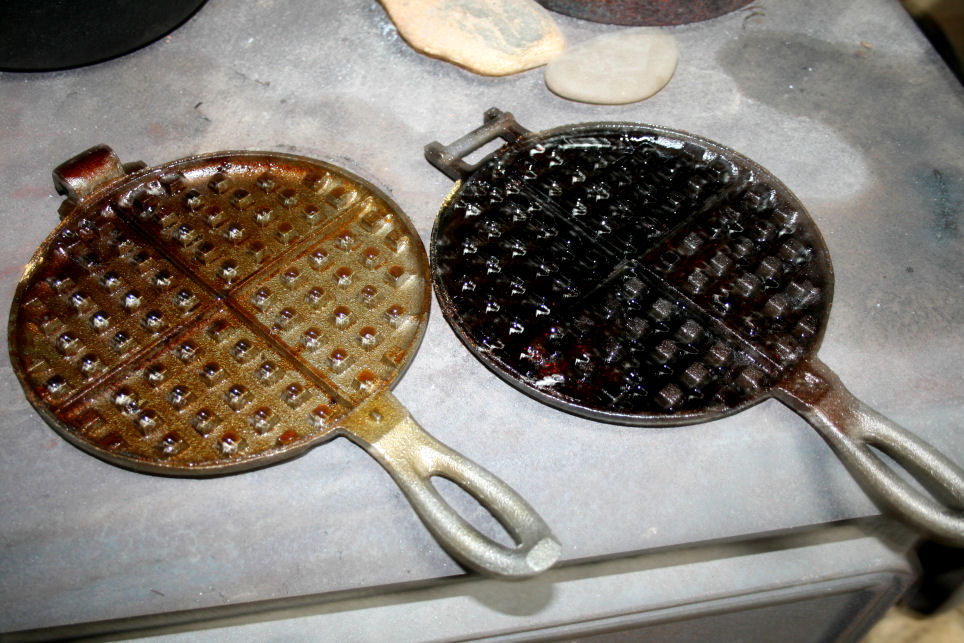 What did i do wrong? This is a total 100% fail! xoxxoxo
Friday, August 7, 2009
DIY: Organic Apple Sauce (I swear it's easy!)
 Oh My Gawd, apples are already falling from the trees here - more then I can possibly feed to the pig and chickens, more then the deer can eat, and more then I can hardly gather! It's a little early for apple season, but going with the flow of nature and positive thinking, when life hands you alot of apples make some apple sauce!
*
Here's what you will need: organic apples (however many ya want or have around), pure water, and a tiny pinch of sea salt. Oh and a pot to cook in. :)
*
 First make sure to wash all your apples really well , whether hand picked or store bought. Then bring them over to the chopping block where the real action starts!
Second: It's up to you whether to leave the skins on or not - with store bought apples their skins usually turn into something so yummy & soft it borderlines candy, so I leave them on. These wild crafted apples have alot tougher skins and even though I left them on, I kinda wish I had left them off. However, apple skins = more nutrtion!
You want to make sure to core every apple - taking out the center rectangle that holds the seeds - and then throwing the fleshy outside part in the pot for cooking. (Ya don't want the cores in there because apple seeds are not good for you!)
 Third: As you can see in the pic below it's not even important to chop the pieces up small, the apples will boil down into a sauce with no problem on their own. Throw in a pinch of salt and watch it melt into yummy-ness. It's all too easy! The only thing it takes is time... first you bring it to a boil, then you lower it to a medium/low setting on the stove and let it cook for about 2 hours. Stir is occassionally so it doesn't stick at the bottom.
NOTE: The longer you let it cook the darker brown the sauce will become - you can control the flavor like this. If you let it cook for 5 hours or more you will end up with the oh so yums APPLE BUTTER, which is very dark brown.
 MMmMmMMmMmm! Oh yeah, I let mine cook for a few hours making it a medium light brown apple sauce with a strong tart flavor.
 It made about a half gallon jar worth of apple sauce from all those tiny apples! YAY!
 XoXo
XoXo
Wednesday, April 8, 2009
Cooking & Warming with a Wood Stove
 The last two days we had a big ole' spring snow storm that blew in enough white fluff and cold air to make the converted barn house I am living in pretty freaking COLD. It's a wee bit drafty in it's original DIY glory - possibly over 80 years old, the barn itself was transformed by some pottery slinging hippies well over 20 years ago. There are two wood stoves inside the house which (in spite of my chemical sensitivities) always makes me feel comforted, because with no electricity you can always be toasty warm and have a pot of soup boiling.
With the snow storm freezing the living shit out of the house, it was time to burn some wood - and try out cooking on top the old buck stove, which to my surprise worked out pretty awesome! I cooked a delicious organic root soup (I must give ya'll the recipe soon) and a pot of organic brown rice, both of which turned out so awesome, tasted so good and cooked so evenly and perfectly I am now wishing I could cook on this thing all through the summer too. The whole house got so warm in that lovely way you see in story books, made me think of images of hanging stockings over the fire place (X-mas in spring?)... I believe even those who are sensitive to wood smoke would probably do alright if they had the $$$ to invest in a truly tight & efficient style stove. I coughed a little when the doors were open to start the fire and add wood, but all in all it was well worth the warmth and hot well cooked food.
BTW- that white in the pic above is not smoke leaking from the stove door, but rather the hand of God touching the stove........... just kidding, it's the light reflecting from the glass door next to the rocks, so my MCS (Majorly Chemically Sensitive) friends need not quiver & choke looking at the pic!
And just for fun, check out the pic below of the icicle's hanging off the bamboo outside my kitchen window, very pretty!

XOXO
Sunday, August 10, 2008
DIY: Sweet Rice Dumplings (from scratch!)
Making sweet rice dumplings from scratch is easier then you might think and only takes 2 ingredients! ( I love anything that takes less the 3 ingredients and comes out right). All you need is sweet brown rice and water, and then a pot to cook in and a place to knead the dough.
 I made my own sweet rice flour from actual sweet rice grains using a special VITAMIX blender my parents were nice enough to give me a few years ago, but you can buy your organic sweet rice flour instead.
 Put the flour in a mixing bowl while you are boiling the water.
 Once the water is boiling pour it slowly over the sweet rice flour, and then once it cools some go ahead and start kneading. Keep adding flour or water as needed (or kneaded) ;) . Work that dough for about 5 minutes or until you think you are done being amazed by the sticky textured rice dough that won't come off your fingers.
 Form any shape dumpling you like, as long as it stays 1/2 inch thick and no larger.
 Throw into a pot of boiling water and like magic when they are finished they rise to the top! Yay, that makes it so easy... no timer necessary.
 You can put the yummy yum yum dumplings in clear soup, eat as is, dowse in soy sauce, dip in rice syrup, roll in chopped nuts or eat with savory rice dish like I did. I have no idea whether they store well, but I put some in a mason jar in the fridge and will update ya'll on how it works.
I made my own sweet rice flour from actual sweet rice grains using a special VITAMIX blender my parents were nice enough to give me a few years ago, but you can buy your organic sweet rice flour instead.Put the flour in a mixing bowl while you are boiling the water.Once the water is boiling pour it slowly over the sweet rice flour, and then once it cools some go ahead and start kneading. Keep adding flour or water as needed (or kneaded) ;) . Work that dough for about 5 minutes or until you think you are done being amazed by the sticky textured rice dough that won't come off your fingers.Form any shape dumpling you like, as long as it stays 1/2 inch thick and no larger.Throw into a pot of boiling water and like magic when they are finished they rise to the top! Yay, that makes it so easy... no timer necessary.You can put the yummy yum yum dumplings in clear soup, eat as is, dowse in soy sauce, dip in rice syrup, roll in chopped nuts or eat with savory rice dish like I did. I have no idea whether they store well, but I put some in a mason jar in the fridge and will update ya'll on how it works.
Subscribe to:
Posts (Atom)