Thursday, November 11, 2010

My Cat Is Scared Of My Dancing

My Cat Is Scared Of My Dancing from Leslie Richard on Vimeo.

My Cat Toots gets really unraveled when I turn up the music and start dancing... I don't know why? But you can watch and see. ;)

....

Dancing Benefits ::::: Health, attitude, breathing, self love, feeling hawt, and the phobias of little cats. I have this idea that when people are happy they treat other people and the earth with kindness/balance. Dancing makes me happy.

Especially when I am snowed in with my very own cabin fevah.!

XOxoxox

Wednesday, November 10, 2010

Snowed

I'M BACK!
Sorry about the few days of M.I.A but we had our first silly slick wet icey snow storm here in the mountains, and well, my particular spot is much like a frozen Yukon. I got more snow then any one else in the area, and despite 60 degree weather now some ice patches still remain up here at the Luck Cabin. The electricity came and went and came back again, my running water in the house went and came back... then my internet went away and didn't come back till this morning.
...
'No electricity' is not too bad in the snow for me because I have a wood stove that keeps me warm, i can cook on it and heat up water. The pipes freezing in my cabin sucks, but I have a non electric pump outside that won't freeze and holds water underground so I always have my spring water.
No internet though... UHG. I missed contact with the outside world. It's only natural, biological, historical and human. At least I have my animals....
JuJu was not a fan of the thicker, deeper snow. Neither were the chickens. Neither was I. The animals stayed in the mini barn for shelter and warmth.
...
COOL TRICK FOR 'HEATING' BARN STALLS::: I read in my Donkey Companion book that keeping some donkey poop in their stall mixed with the wood shaving or hay actually helps keep it warm in the winter due to the heat produced by the composting process. I knew that alot of heat is produced by composting, but I wasn't sure it would really work in this application. But I found that JuJu's stall was warmer then outside. :)

Xoxoxo

Friday, November 5, 2010

Eco DIY: Fabulous Scrap Fabric Purse

Craft bonanza! After making my patchwork blankie out of scrap fabric I sat down with a notebook & pen and started dreaming up other simple DIY projects. This handbag is not hard to make and looks very eco chic (superior handmade style!)
It's also made entirely out of fabric, so all you need are basic sewing skills to put it together.
*
STEP 1 :
Choose two contrasting fabrics, and pin them together in a rectangle shape to cut out.
I chose some velvety animal print, and a kimono type fabric for their flamboyant contrast.
STEP 2 :
Fold over the top edges of the purse, and sew a strong seam at the very bottom. This is to create a drawstring style hole for the purse straps to pull through.
Both sides should then have the drawstring hole, which are sewn into the inner side of the purse. (see pic below)
STEP 3 :
Fold the purse over, with the drawstring holes lining up evenly. Sew a seam along both sides (left and right) but NOT over the drawstring holes.
The purse should then look like this pic below... my animal print is the inner part, and the kimono fabric is the outside of the purse.
STEP 4 :
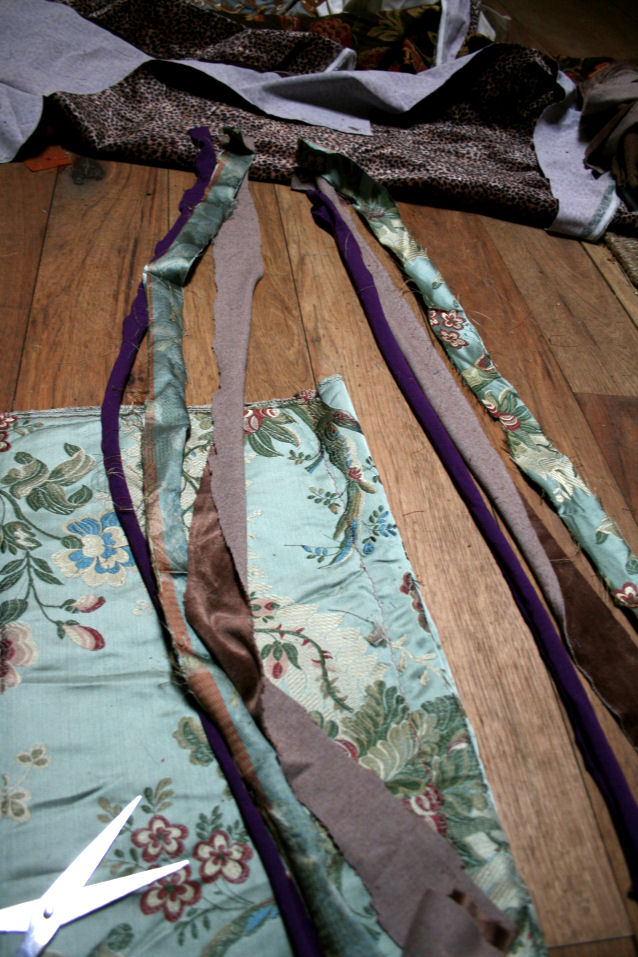
THE STRAPS ::::
Cut six strips of scrap fabric (or tie pieces together), make two groups of 3 strips, tie a knot at the top of each one, then BRAID! yay! I love braiding. :)

Use a big safety pin to pull your braided strap through the drawstring holes on both sides...
...tighten the straps, then tie them together at the top.
ALL DONE!
HANDBAG HEAVEN :::::
How easy and cute is that?! Plus functional! You could use this as a purse, but also as a knitting/crochet bag! Or maybe carry your small pets around the house in it. ;)
I like this eco crafting project alot... now back to my notebook to think up more things I can do with this fabric.
****

Here is a quick lil' tutorial vid for this DIY Purse project -(if you learn better with music and short commands...) ;)


Xoxoxo

Snow Day With My Animal Friends! (Ducks, Chickens and Donkey)

*
Here are some videos of my animals here at the Luck Cabin today on our first snow day together! No one seemed to care about the changing seasons except for me... and maybe JuJu the donkey.


*
This second video I am singing. I don't sing well but it doesnt matter to the chickens and donkey because they love to be sung to (this is one of those things that makes animals cooler then humans!)
Singing time makes Beep Beep the chicken sleepy... which I find so cute I could explode, or maybe melt, or fall to pieces. :)


XOxoxox

Thursday, November 4, 2010

Eco DIY: Patchwork Blankie (from scrap fabric)

My ever ambitious mom entered me into a craft fair (ohmygawd Mom!), and I have only one month to make a craft booth's worth of eco friendly stuff! I am bracing myself for a month of non stop crafty mania...
and here is the very first project.
I have had this one tucked in the corners of my imagination for a while now, a patchwork blankie of luscious luxurious colors. A blankie made of only scrap fabric, sewn together in a simple way. I got the scrap fabric that was left over from a seamstress friend (it's amazing all the fabric that is left & discarded from people's pillow, curtain, and bed spread decor!)
STEP 1:
I cut a buncha squares the same size (see top pic with my cat Toots in it). I cut enough so there could be four rows of six squares.
*
STEP 2:
I sewed squares together - 6 in a row going up and down. (see pic above) I did this four times, making four separate LONG rows.

(NOTE: however you decide to sew them together, the important part is just being consistent. I laid the right side over the edge of the left side of each square and sewed a seam on top. Every time.)
STEP 3:
I took each row, turned them to the under side and made a seam. A seam that would be covered later by the backing of the blanket.
STEP 4:
The backing of the patchwork blankie was just a large piece of fabric i found in the scrap fabric bag. I pinned the patchy part on top to hold it in place, and then sewed a seam on top.
STEP 5:
Once the seam was in place, I evened out the edges of the brown fabric backing, and then cut wide "fringe". Each piece of fringe was then tied into a knot at the bottom.
(this is the knot fringe after it was totally finished- see pic below!!!) Super rustic cute. ;)
FINIS :::::
I like it! I like it!
It was a little hard to do since it was my first time sewing something like this, but it only took me half the day. The hard part is just the tedious monotony of putting it together, not the actual skill it takes to make.
Totally worth the time! Wish I could keep it for myself. :)
Xoxoxo

Wednesday, November 3, 2010

Spring Water + Old Sink = Fresh Water Container For The Animals

In the fenced in acre where my animals live there are two spring water sources (plus I have a rain barrel I am setting up at the mini barn!)...
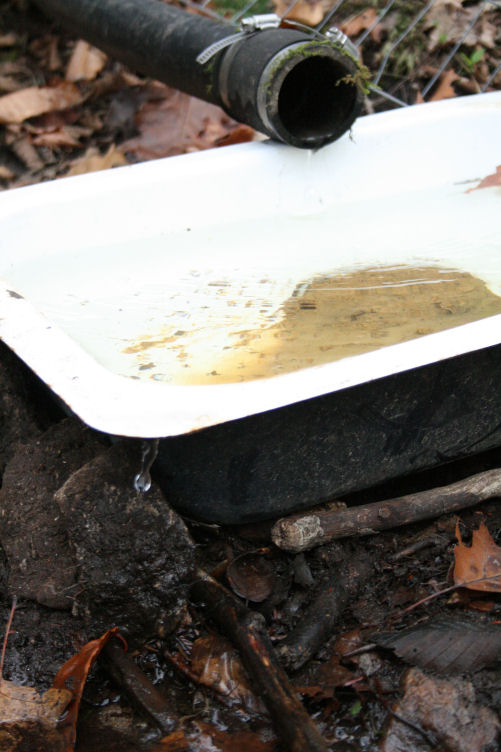
I found a nice lil' sink underneath my cabin that I thought would be perfect for catching the spring water that had already been piped before I moved here. I settled the sink into the dirt and then took a handful of thick native clay (that has been dug up when building the barn) and shoved it into the drain to block the water from leaking. (I have tried this trick even with leaky buckets and had total success!)
Me and JuJu the donkey waited for it to fill up completely, drip by dribble for about 30 minutes.
Once the sink was full I had it lean slightly to the left side so that the water would overflow out in one spot... since it's spring water that constantly flows year round whether it comes out in a pour or a drip.
Before even pimping it out with some rocks, leaves and hay, the chickens came by to test it out...
Rooster approved.
I put a larger flat rock under the drip, and smaller rocks around the entire sink to make it sturdy. I also started covering the black pipe I had dragged under the fence with debris just to make it look like it's not there. Would be cool to make a second water pool with some rock and clay only under the drip.
This sink will ensure that no matter what the animals are constantly getting a flow of fresh spring water that has no contaminants in it of any kind (including their own poop.)
Yay, I am feeling clever now. ;)
PS - I got the idea to do this with the sink after having BAD dream last night that something happened to me where I couldn't get home & my donkey had no water and became very sick, I was crying in the dream because I thought she was gonna die of dehydration. Nothing like a lil' nightmare to get you extra motivated.
Xoxoxo

Tuesday, November 2, 2010

Making Use Of My Halloween Pumpkin

I made sure to buy an organic pumpkin this year and carved it with my lovable faux Frost knife....
I don't like being wasteful and could have done better with utilizing my jack-o-lanterns' sacrificed pieces parts...
so here is what I did do, and wish I had done ::::

1. Save the seeds to plant next summer (win)
2. Save seeds to roast & eat (fail)
3. scoop out innards and cook it down to eat (fail)
4. light a candle in it and feel total artistic pumpkin carving bliss (win!)
5. feed the carved pumpkin to my chickens when it's face starts to cave in (future win)

Ya'll have any more ideas??!
xoxox

Monday, November 1, 2010

Artifacts Of The Luck Cabin

I found the Pepsi Cola can while hiking in the woods... the Pabst Blue Ribbon & Atlas Mason jar were dug up by my archaeologist chickens. :)
The cans are so thick, no one would ever make a can that thick these days unless it was holding motor oil. You can see how they had the older thinner/narrow flip tops.
This is totally before advertising took the flashy splashy subliminal turn it thrives in now, because all pepsi had to say for itself was "colored with caramel".
And Pabst beer's big splashy announcement ::: "no opener needed".
The Atlas mason jar was empty, but I like to imagine some moonshine had once been in it and had to be buried to keep it secret. But it all leaked out when the top rusted.
Xoxoxo

Watercress, from grocery to pond

When it comes to food and saving money I can be one of the most oportunistic shoppers ya eva' met. Not that I am the lady who pulls out all the coupons and holds up the line cause the half of them are expired- I am the lady who is secretly looking for produce that will keep on giving. Produce with seeds in it that I can plant (winter squash, apples, pears, avacodoe), root veggies (like turnips, rutabaga, radishes, beets) I can put the tops back in the ground to later eat their greens and get seeds from them after they flower, I even plant the bottoms of my onions and eat the green stems that grow back out.
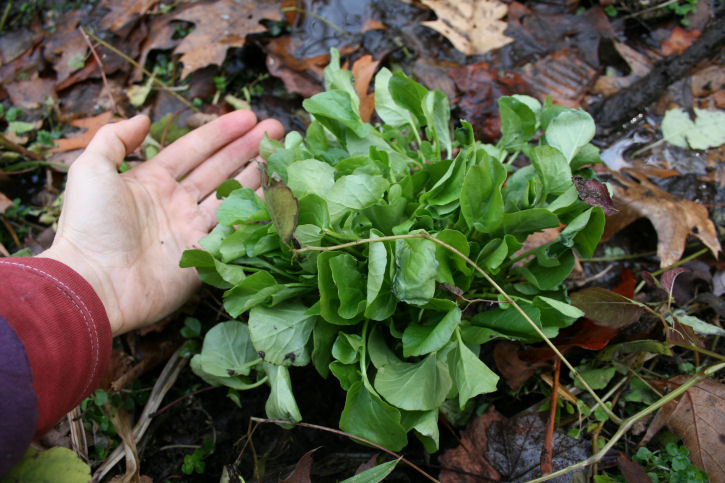
My latest grocery find though has me majorly stoked! Watercress... organic watercress being sold not at the health food store but at the regular ole' grocery... watercress that still had it's ROOTS.
*
I bought the watercress straight up to plant in my pond, mushy spring water spots...
I searched around my pond for a good soggy place to plant those roots in the ground, in hopes to have watercress growing in bunches over the next few years.
I dug a hole easily with a stick, you can see the water seeping into the hole...
Looking bee-U-Tee-ful... now i can pick a few greens off to eat and let the rest make a home here.
I love LoVe LOVE grocery items that keep on giving. :)
Do any of ya'll do this too, with grocery foods?
UPDATE:::
Thanks to oko box reader Jason for pointing out that this is a different kind of Cress then watercress, it's called * upland cress * and does not grow in the water like watercress. It grows on land.
Go to Jason's Blog, he has cool as hec pictures of animals he caught on one of those special motion cameras!

xoxox

Saturday, October 30, 2010

EcoWeen: DIY Native American Costume

It's Halloween weekend! YAY! Being that I was raised in the Mardi Gras culture down in New Orleans, I get really into costume making, probably more then any other kind of sewing project. Back home Halloween is almost like a mini Mardi Gras and the costumes are always elaborate, lovable, amazing, hysterical and just plain wrong. It's a bar raised too high & it's hard to live up to... but I try.
*
This year I decided to make a Native American costume (I am part native american) with a lil' Clan Of the Cave Bear flare (cause I just finished reading the whole entire book series!), but mainly I chose this genre because I have been collecting feathers from my chickens, rooster, the wild turkeys, and a few brightly colored ones given to by my awesome friend Heather....

THE HEAD PIECE ::::
I started making the head-dress first because that was going to be where most the feathers would go and I was excited to use them! I did not use any kind of glue, tape or toxic products to get my feathers to stay in place. I decided to sew them directly (and carefully) to strips of black organic cotton fabric (locally made here in north carolina!)
I attached a small jaw bone to the center front, and hung more feathers and beads from strings that reach all the way past my shoulders. (Gives it major dramatic style!) The construction is really simple, and just ties in the back of the head.
THE DRESS ::::
The first thing I did to make the body or dress part of the costume was to trace a shirt I already owned and fit me well onto some paper, in order to make a pattern. I drew (freestyle) the bottom half of the dress and then cut out the full pattern...
This is the pattern without the sleeves ( you can make it with or without sleeves.) I planned on adding in sleeves because I knew the weather here in the mountains would be cold for Halloween.
I pinned the pattern onto the velveteen bamboo fabric and cut out the back side of the costume...
This is the tedious part:::: I then CUT the pattern into three panels to make the design for the FRONT of the dress.
Each panel will be sewn back together, but I cut them separately in order to tighten up the bodice in the front.
These are all the pieces that need to be sewn together (pic below). I used more black organic cotton fabric as the strips along the front bamboo fabric bodice.
TIME TO SEW::::
I put all the pieces together and then cut out some black organic cotton arm bands to tie onto the sleeves. They are removable and I made it fringed by cutting strips into the fabric and pulling each fringe piece tight.
I also cut fringe strips into the bamboo dress at the bottom of the long sleeves, and at the bottom hemline of the dress!
DECORATION::::
You can never have enough. Period.
Once I got started with the feathers, beads and (real) bones it was hard to stop.
In fact, my cabin looked totally trashed by the time I was done with making this costume!!!!
THE END RESULT IS Fuckin' FIERCE!! ::::::::::::::


Drama, Character. It's what halloween is all about.

HAPPY HALLLLOOOWWEEEEENNnnnnnn!
Xoxoxox
*
Fabrics by:::
The Bamboo Fabric Store, see here.
Near Sea Naturals, see here.
*